Installation Manager
Access can be granted at the Global, Authority Class or User level.
Follow these paths to grant access at each level.
Global Level
- NAV 1>A in the Opt field for Installations>Y for both settings: Allow Access to Installation Manager Administrator Settings and Allow Access to Installation Manager in View-Mode only
- When set to Y the user must be setup as an installation manager and be assigned warehouses and cost centers, but when they log in they will only be able to view the schedule. they will not have access to schedule orders or update existing scheduled jobs.
Authority Class
- NAV 2> W in the Opt field of an Authority Class>A in the Opt field for Installations>Y for both settings: Allow Access to Installation Manager Administrator Settings and Allow Access to Installation Manager in View-Mode only
User Level
- NAV 5 >W in the Opt field of a User>A in the Opt field for Installations>Y for both settings: Allow Access to Installation Manager Administrator Settings and Allow Access to Installation Manager in View-Mode only
Access
The Admin Panel is accessed via the User's drop down menu.
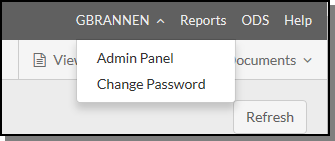
The user must have Installation Manager permissions at the user, authority class or global level.
Automated Emails
Customer Emails
This section allows you configure emails that are automatically sent to customers during specific events of the installation cycle.
The email is sent to:
- For Retail customers - the email address assigned to the customer in the Retail Customer File.
- For Billto Customers - The first email record flagged to receive Acknowledgments in the Phone Number Maintenance portion of the Billto File.
- The Install Email on the Order Details window; if a value is entered.

Post Installation Communication
Notification of Scheduled Job
When an Installation Manager schedules a job for an Installer that belongs to his warehouse or receives approval to utilize an installer from another warehouse an email is sent to the customer.
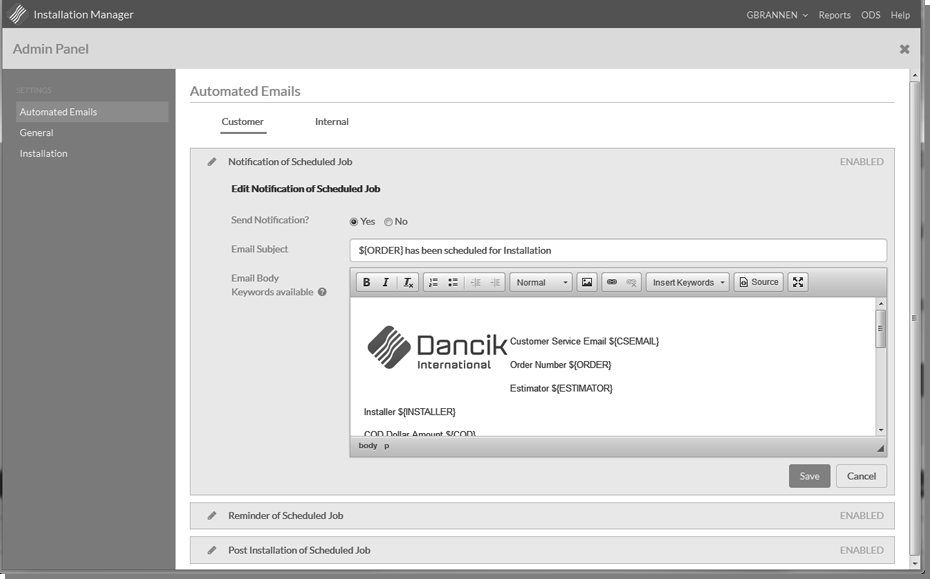
- Send Notification - Clicking Yes enables this email to be sent out automatically. Enabled displays on the right hand side of the email listing if Send Notification is activated.
- Email Subject - Enter a subject for the email. A combination of free flow text and key words can be used. Keywords can be used to automatically add information to the email such as ${ORDER} - order and ${FIRSTDATETIME} - First Scheduled Installation Date. A list of all the available keywords is available by clicking the "?" icon or by selecting the Insert Keywords option in the email editor.
- To change the Logo, double click the Kerridge logo to display the Image Properties window.
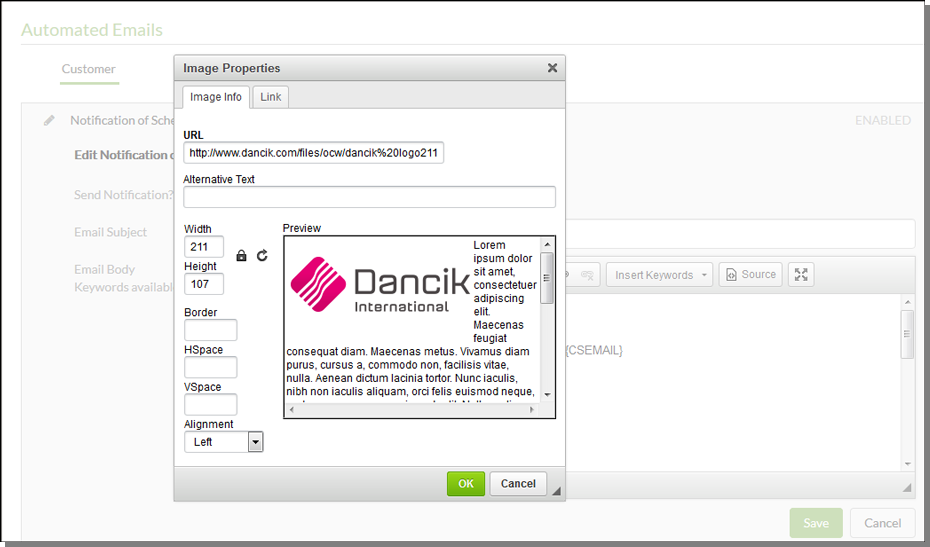
Use the URL box to locate the new image.
There is no set image size. After importing the image in, use the Reset Size ( ) feature to the right of the Width and Height boxes to get the image size right.
Reminder of Scheduled Job
Automated emails can be sent to remind a customer of an upcoming scheduled job.
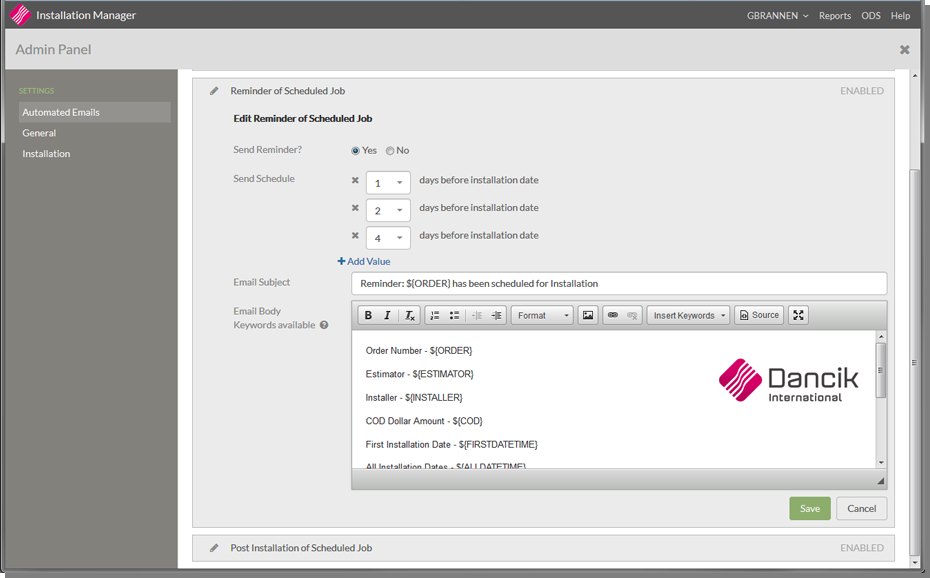
The fields are the same as for the Notification of Scheduled Job except for the Send Schedule setting. The Send Schedule setting denotes how many days prior to the scheduled job (or the first scheduled day or a multi-day installation job) a reminder email is to be sent. Multiple time frames can be selected.
Post Installation Communication
After an install has been completed a follow up email can be sent to the customer.
The settings are the same as for the Reminder of Scheduled Job email. The difference between the Send Schedule option in Reminders and Posts is that in Reminders you set the days prior to the first installation date that the email should be sent while in Post Installation you set the days the email should be after the last scheduled job installation date.
Internal Emails
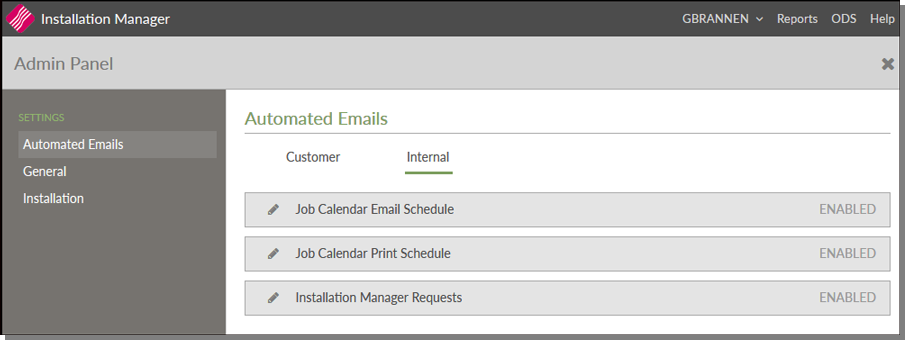
Job Calendar Email Schedule and Job Calendar Print Schedule - These options allow you to set up a day(s) and time that the job calendar can be emailed or printed. For the Job Calendar Print Schedule option, installations are only printed for the selected warehouse.
Installation Manager Requests - These emails are sent when an installation manager requests an installer from a warehouse that he does not manage.
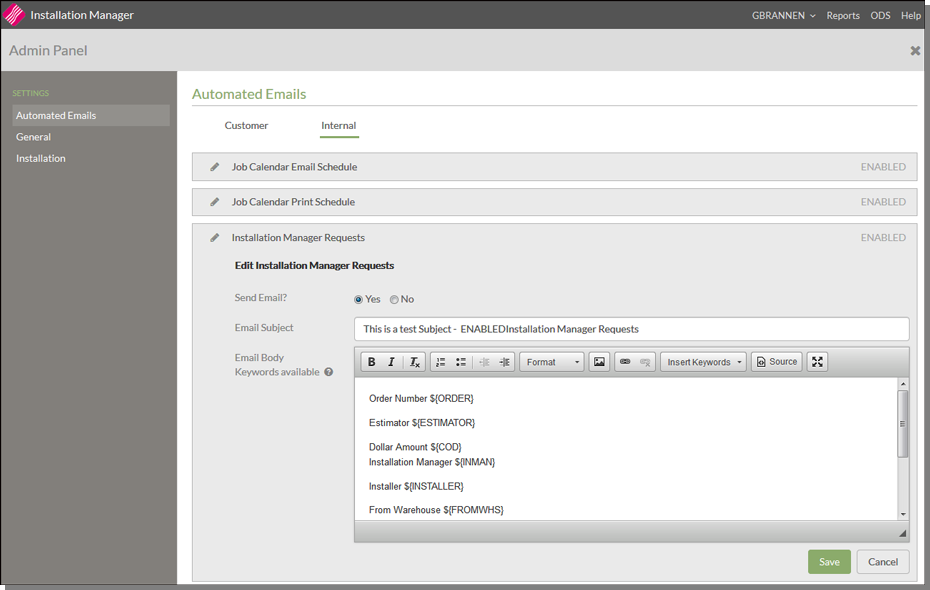
Email Subject/Email Body - Enter a subject/body for the email. A combination of free flow text and key words can be used. Keywords can be used to automatically add information to the email such as ${INSTALLER} - Installer and ${FIRSTDATETIME} - First Scheduled Installation Date.
- A list of all the available keywords is available by clicking the ? icon.
General
Cost Centers
The cost centers created here are the ones that are displayed in the Cost Center drop down menus throughout the Installation Manager application and used for Installation Manager setup.
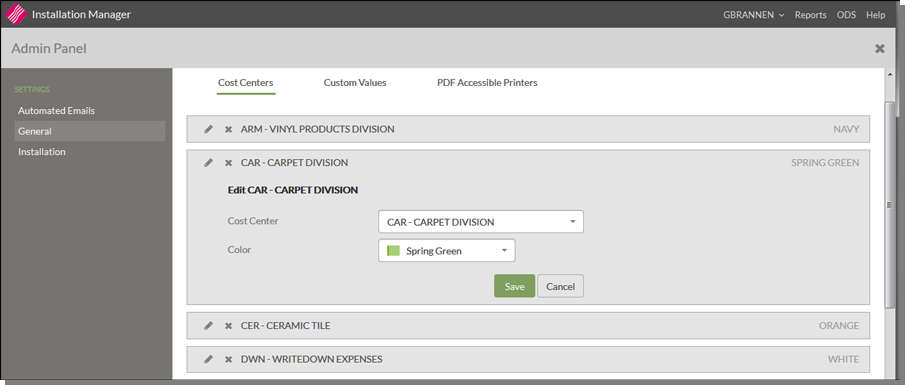
Use a Color to help easily identify the cost center when viewing scheduled installation jobs in the calendar views. A color can only be used once.
Custom Values
This is where the values used in the Schedule and Contact Log are created.
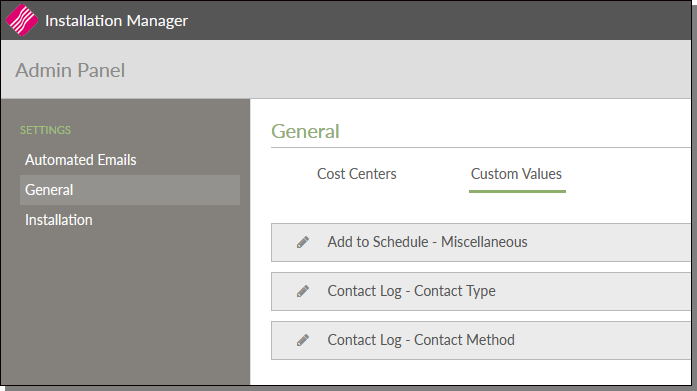
- Add to Schedule Miscellaneous - When a Misc job is scheduled the values entered here are displayed in a corresponding drop down list so that the user can select the miscellaneous job type.
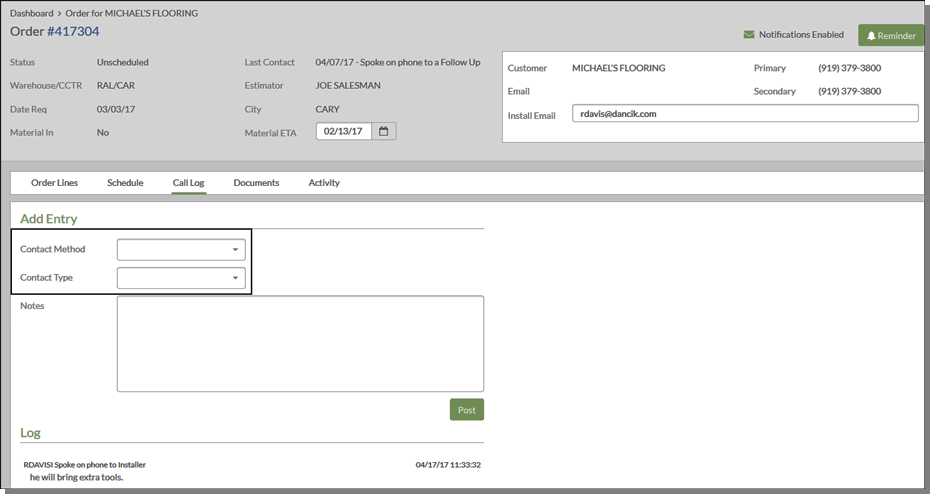
- Contact Log - Contact Type - Allows you create contact methods such as Email or home phone that are used in Call Log. This is the type of person or business you are contacting, like the customer, Installer, or Estimator.
- Contact Log - Contact Method - Allows you create descriptions for contact methods such as spoke to on phone or emailed that are used in the Call Log. This is the method or form of communication used when making contacting. The Contact Type and Contact Method are available on the Call Log on the order detail window.
PDF Accessible Printers
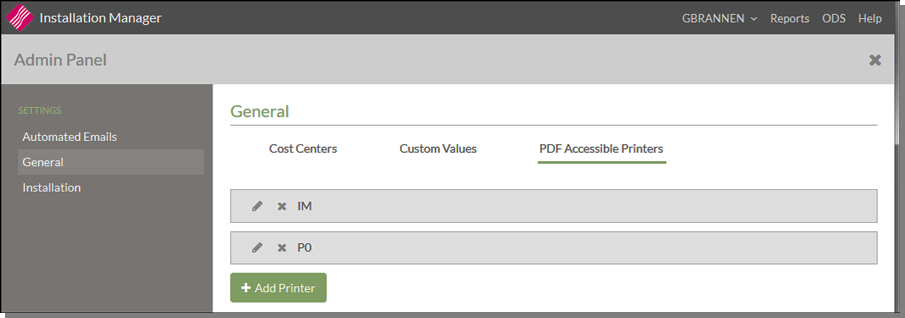
This screen allows the user to Add Printers that are capable of printing PDF documents. The printers listed here appear as options when the user prints documents from within the Order view or within the Print Documents option found in the Dashboard.
Installation
This part of the Administration Panel allows you to create and/or edit Installation Managers, Teams and Installers.
Managers
These are the only people who can schedule installations.
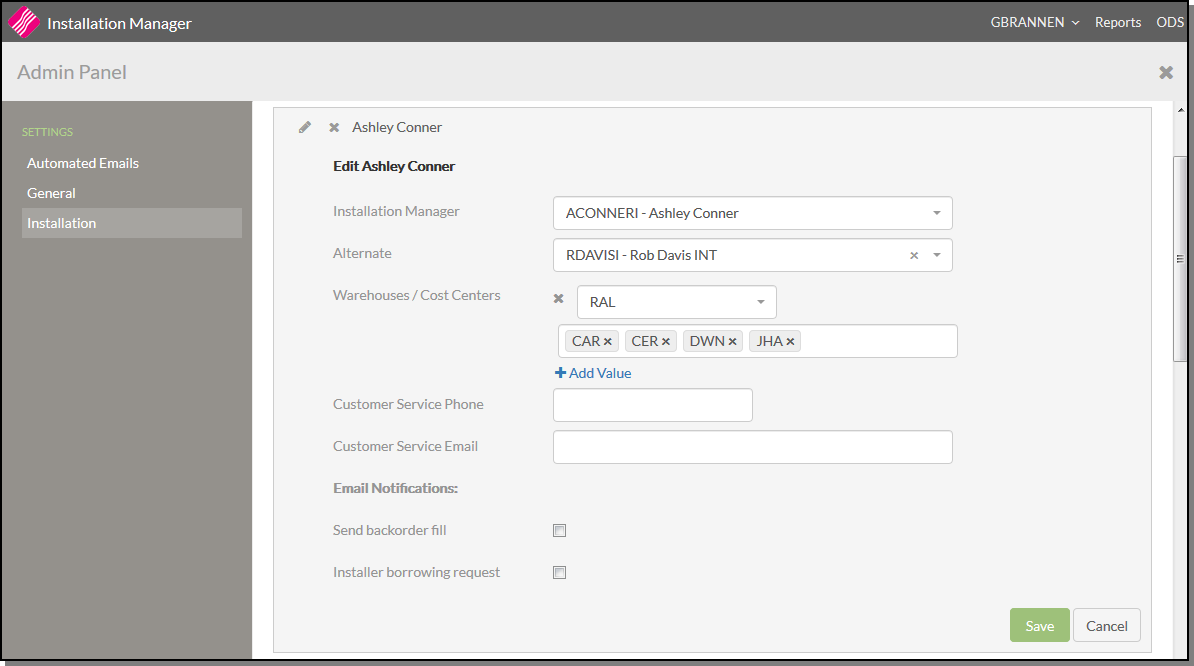
Create a new manager record or edit an existing one.
| Setting | Description |
| Installation Manager | Select from a list of all the Navigator users on your system. |
| Alternate |
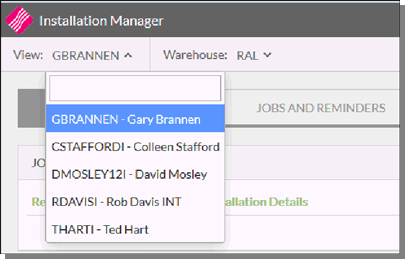
An alternate has access to the same Dashboard, Orders, etc., as the main manager. The managers that an alternate manager has access to are selected via the View drop down menu in the upper left hand corner.
In the example above, GBRANNEN is the primary manager, but since he is assigned as the alternate for other installation managers he can access their dashboards. |
| Warehouse Cost Center |
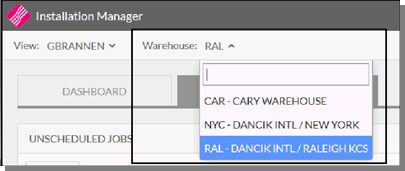
Select a warehouse/cost center combination that this Manager can schedule installations for. Changing the warehouse and/or cost center refreshes the dashboard to reflect the new warehouse/cost center. The orders and installers are assigned to the new entry. Only one warehouse can be selected per field. To enter more use the Add Value feature. Multiple cost centers can be entered. On the Dashboard: Warehouses are selected/changed via the Warehouse drop down menu.
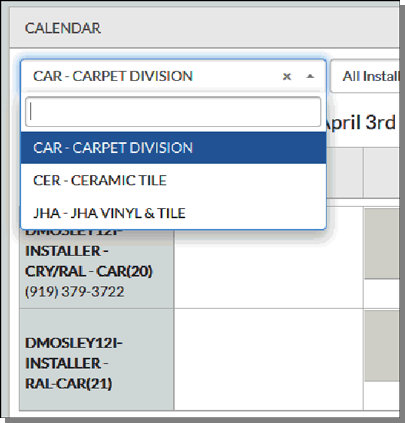
Changing the Cost Centers on the dashboard changes the installers displayed to those that are assigned to the selected cost center.
|
| Customer Service Phone Customer Service Email |
Enter the customer-facing phone number and email address that a customer can contact if they have a question about their installation. The phone number and email address do not have to be the Installation Manager's. They can be to someone else familiar with installations at the warehouse and cost center. The Customer Service Email is used as the From Address on the Automated Customer emails. |
| Send backorder fill email notification |
Sends an email alerting the installation manager that an order on back order is being filled and can be installed. If more than one backorder line on the order is being filled, only one email is sent for the entire order. An email is sent to all the Installation Managers that have the Warehouse/Cost center combination of the order/order lines being filled. The email is sent to the email address assigned to the user via menu option NAV 5 on the green screen. |
| Installer borrowing request | This flag denotes who is to get the current Installer Borrowing Request Emails. Check the Installer borrowing request box to designate that this manager DOES NOT get the automated emails when an installer outside of their warehouse is selected for an installation job. The default is for the setting to be activated so the existing functionality is not disrupted. |
Teams
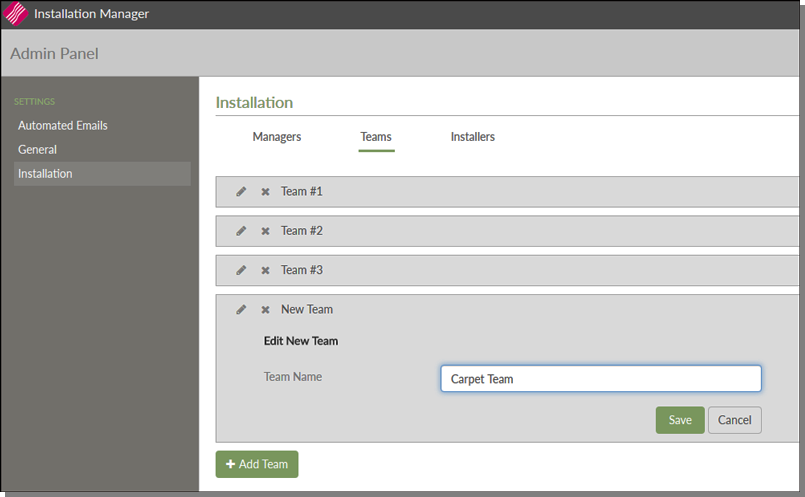
You can build teams based on things such as expertise or location. For example, you can create a carpet team or tile team composed of personnel skilled in installing those products.
Installers
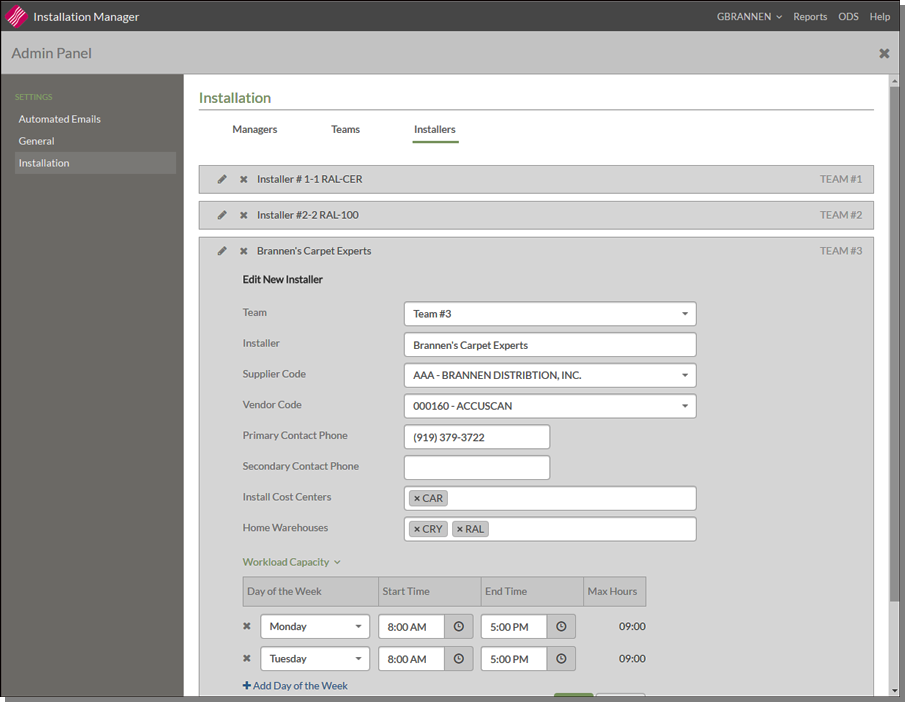
This part of the Installation Scheduler lets you build a database of installers.
| Setting | Description |
| Team |
Assign the Installer to a Team. The teams are created via the Teams tab. This field is not required when creating an Installer record. |
| Installer | Installer name. |
| Supplier Code Vendor Code |
You can cross reference each installation team to the supplier and/or vendor codes that represent these teams within accounts payable. These codes help you to reconcile the cost of labor to AP. When you enter the invoice from the installer into accounts payable, the system matches the AP supplier or vendor to the cross-referenced installation team. You can use one or both fields. If you enter a Supplier Code, AP entry automatically assumes that you are performing labor reconciliation instead of manifest reconciliation.
|
|
Primary Contact Phone Secondary Contact Phone |
Enter the phone numbers for the installer. |
| Install Cost Centers |
Enter the cost centers that the installer works with. Only the installers assigned to the active cost center are displayed and are available to be selected. If the field is left blank, the system assumes that this installer can handle all cost centers. |
| Home Warehouses | Enter the warehouse codes that this installation team can work from. If you enter warehouse codes, the installation team is only assigned jobs from those warehouses. These warehouses are compared to the header warehouse of each order. |
| Workload Capacity | |
| Day of the Week | Enter the days that the installer is usually available. |
| Start/End Time | The normal working hours for the installation team. The installer is not available before or after these hours. |
| Max Hours |
This is the maximum number of hours this team is available on this particular day. The Max hours are used in the Schedule Calendar to show when and how many hours an installer is available to work on a given day, but it is not used to restrict the times at which an installer can be scheduled. |
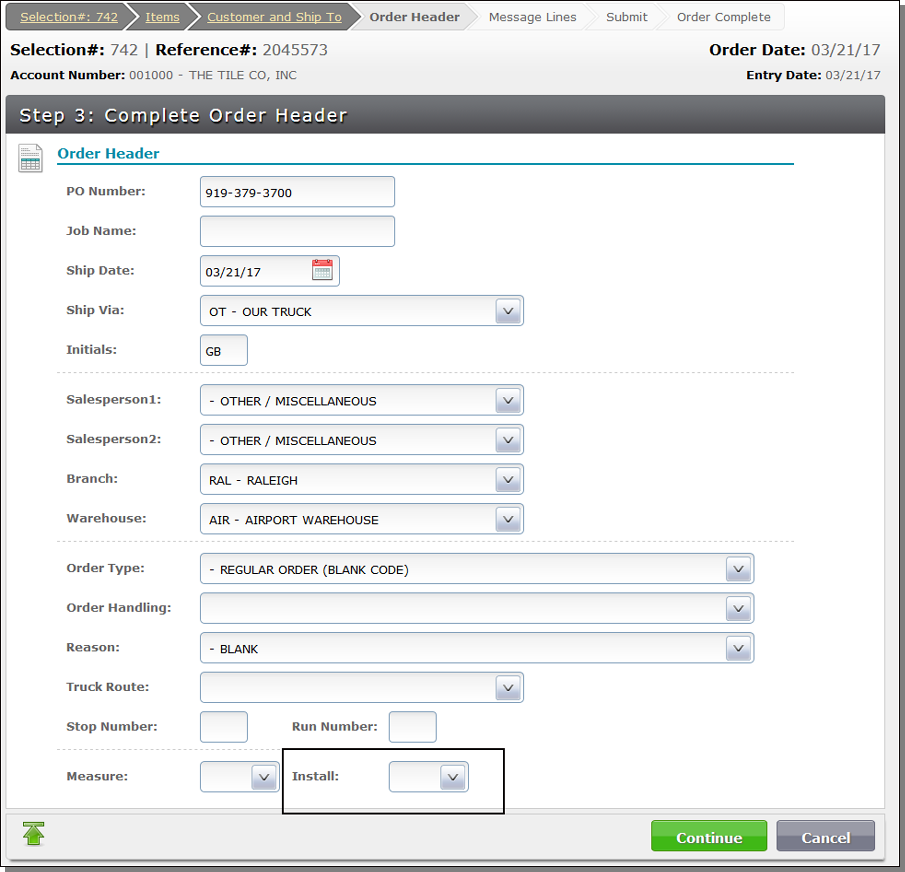
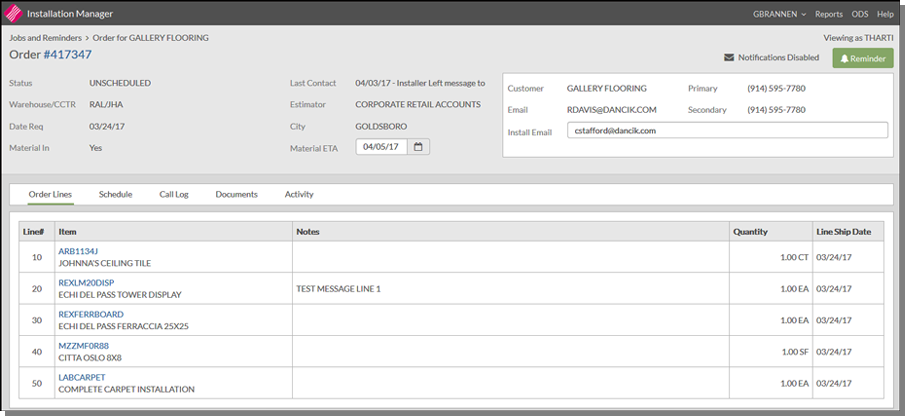
- Activating the Install options alerts the system that the order requires installation. If the Install option is selected in a DNav Customer Order header or in DNav Showroom Checkout, the order appears in the Installation Manager Unscheduled Job list and will allow the order to be scheduled for an installation job.
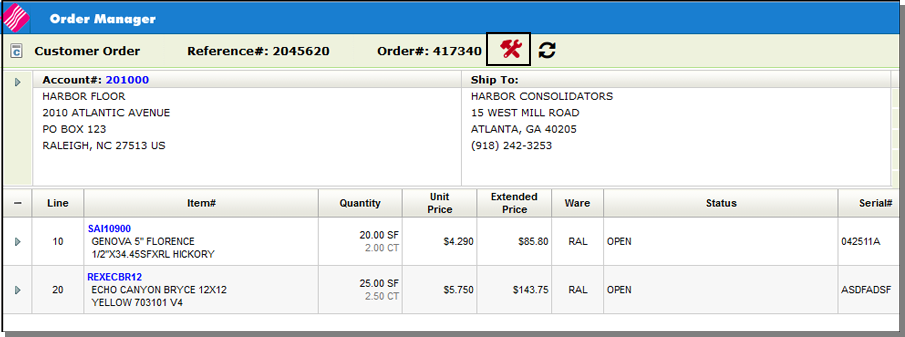
- When the Installation Flag is set, the symbol (
 ) appears to the right of the order number.
 - If the order has been scheduled for installation the icon is green.
- If the order has not been scheduled for installation the icon is red.
- Clicking the icon opens a window containing the following:
- A list of Installers and Install Dates that have been assigned to the order.
- An option to select the Contact Log which opens a window where a user can record information regarding communication with the customer.
- An option to select Set Reminder which opens a window that allows a user to enter a reminder for an installation manager as well as the date at which that reminder should appear in the managers reminder list.
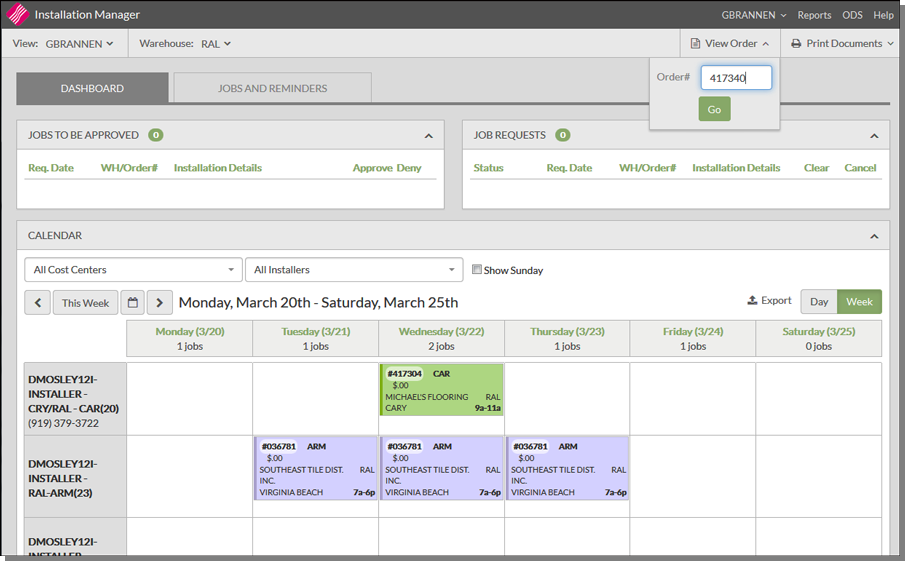
- Access the Installation Scheduler to arrange for installation. The Installation Manager Dashboard is the first window to appear.
- Click View Order in the upper right corner of the window and enter the order number.
- Click Go to access the order lines.
- You can click on an item to access the following:
- Item Details
- Purchase or Back orders generated for it
- Inventory
- Related Items
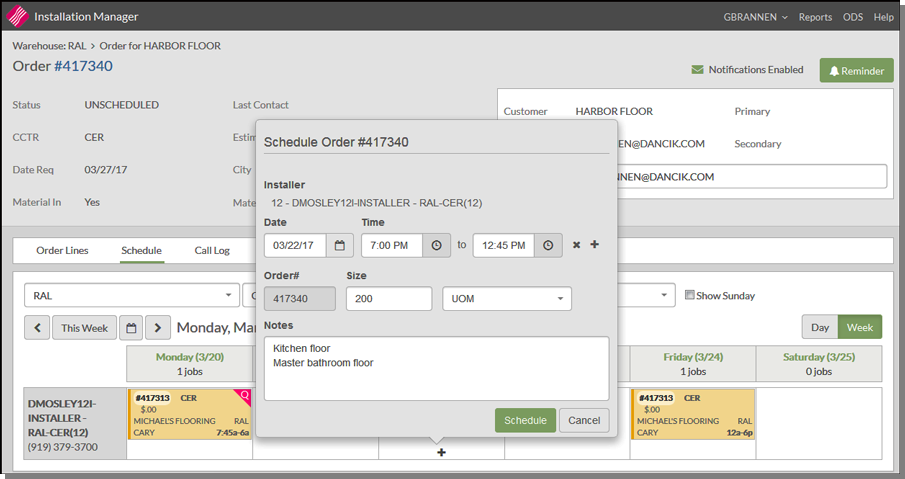
- Click Schedule to display the scheduling calendar.
- Scroll over a date. A "+" symbol appears at the bottom of the date box. Click the "+" and enter the Installation information.
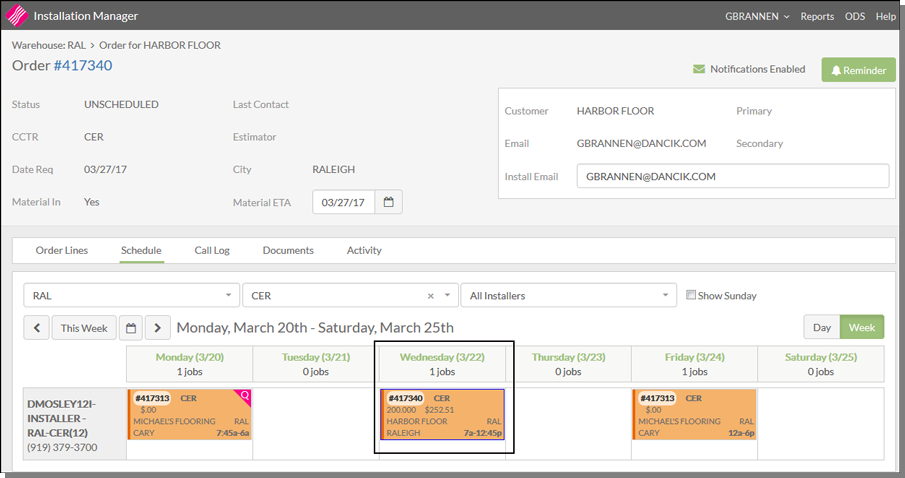
- Click Schedule to add the order to the calendar.
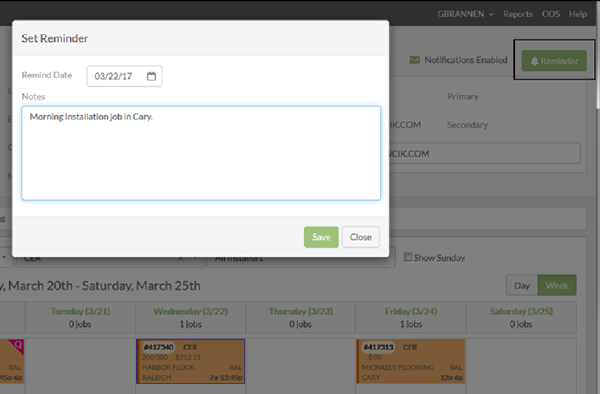
- Now that we have the order set up for installation we might want to schedule a reminder. Click Reminder in the top upper corner of the window and enter the reminder date and any applicable notes.
- To get to the dashboard, click the warehouse in the bread crumb navigation in the left hand corner.
Navigator Order Header
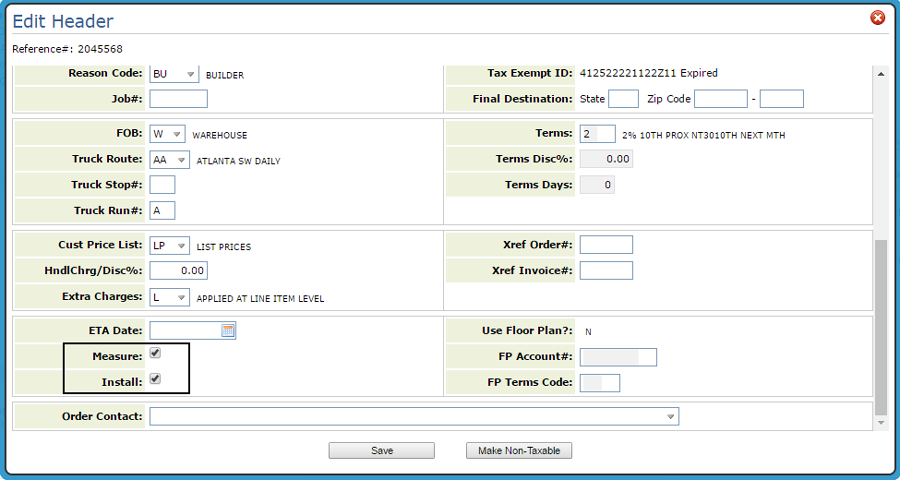
Selection Sheet - Step 3 of the order process
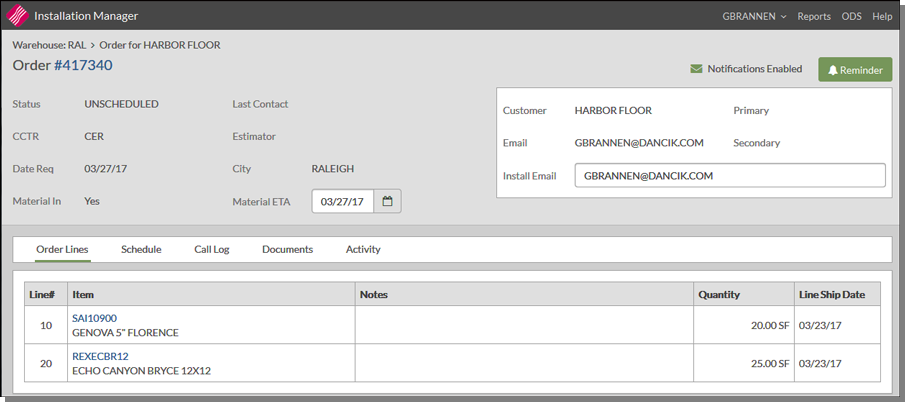
Notifications can be enabled or disabled; in the example shown above Notifications are Enabled. If Notifications are disabled, via the Admin Panel, no customer emails from can be sent.
Install Email: An additional customer contact email can be entered in the order screen. This email is used on all customer emails generated by Installation Manager.
Material ETA: This field allows the installation manager to enter an estimated date upon which any back-ordered material on the order may become available.
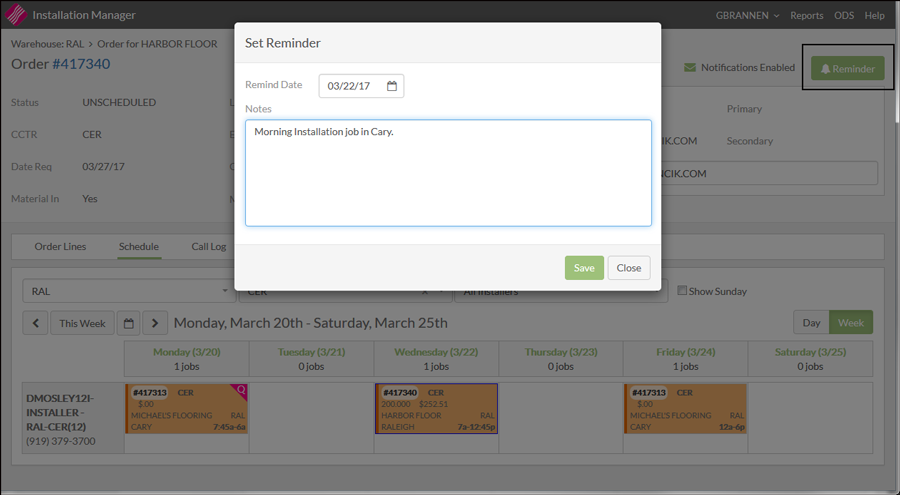
A reminder gets added to the Installation Manager's Dashboard.

The Installation Calendar and default Installation teams that display are associated with the active Installation Manager. Follow these steps to request an Installation team from a warehouse assigned to another Installation Manager.
- In this example, the order originated out of the RAL warehouse and the cost center is JHA which is for vinyl and tile.
- Click Schedule and use the Warehouse drop down menu to select the new warehouse.
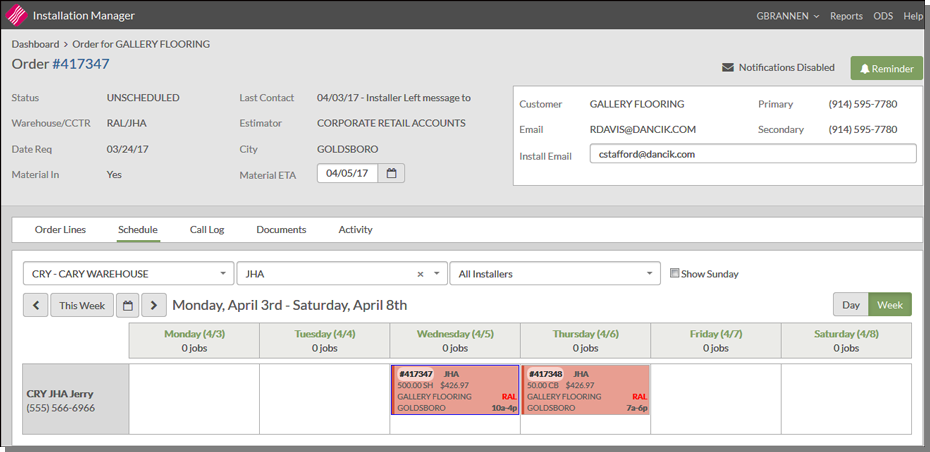
- The installers for the selected Warehouse/Cost Center combination display.
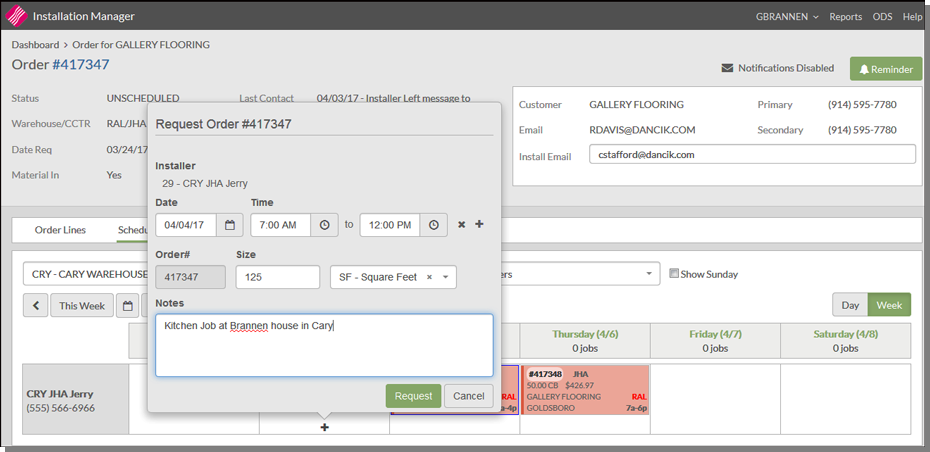
- Scroll over the day you want to schedule the job for and click the "+" that appears.
- Enter a start and end time, the size of the job and any applicable notes.
- Click Request to add the job to the calendar.
- Notice that the color is different from the other scheduled orders. When the request gets approved by the Installation Manager responsible for the Installation team, the color changes to denote a scheduled order.
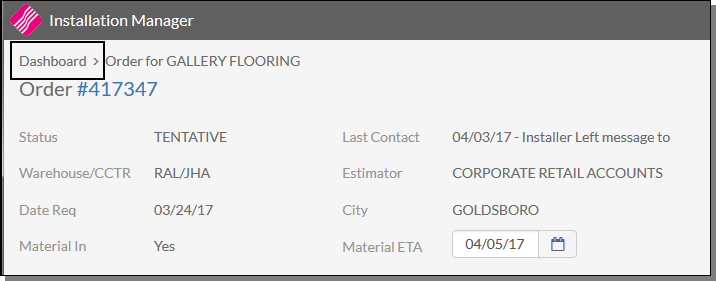
- Go back to the Dashboard by clicking the link in the bread crumb in the upper left hand corner.
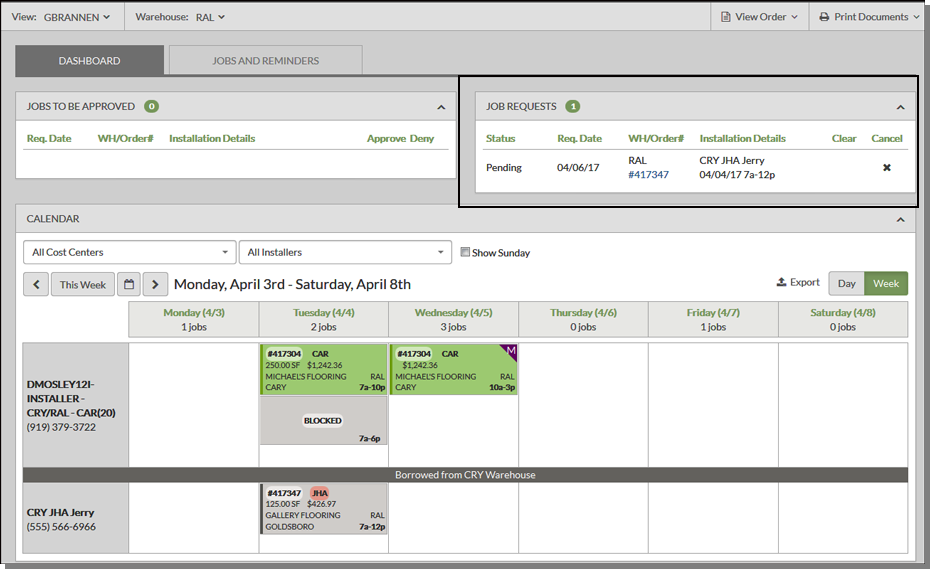
- On your dashboard, an entry is made in your Job Requests box. This pending request stays in the Job Requests box until it gets approved by the other Installation Manager.
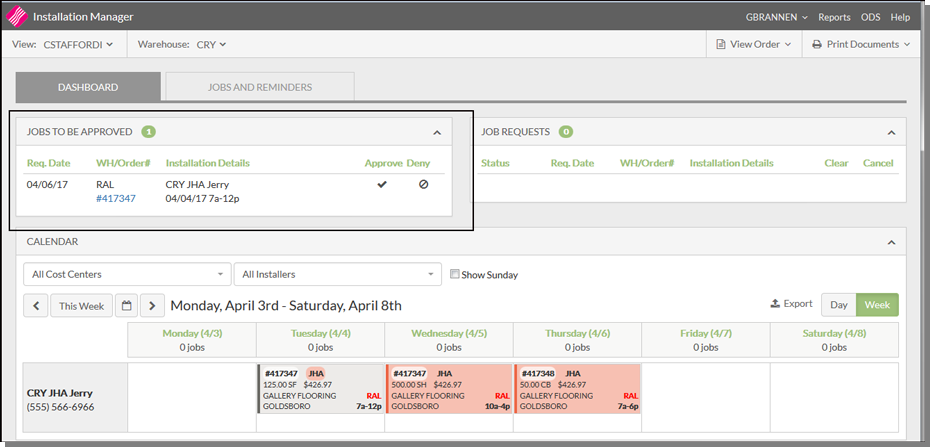
- An entry is made into the approving manager's Jobs to be Approved box.
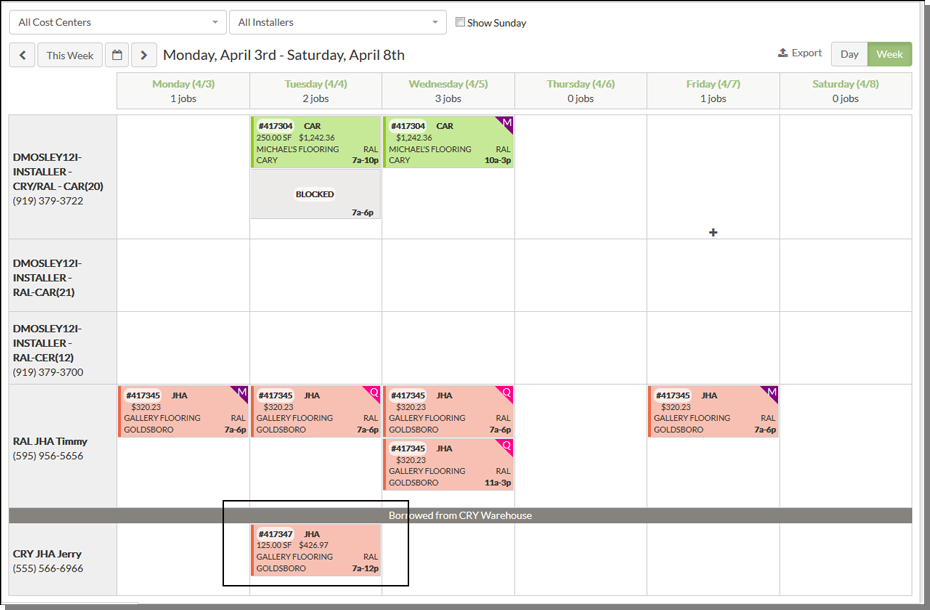
- After the request is approved, the color of the order changes to denote that it is now scheduled.
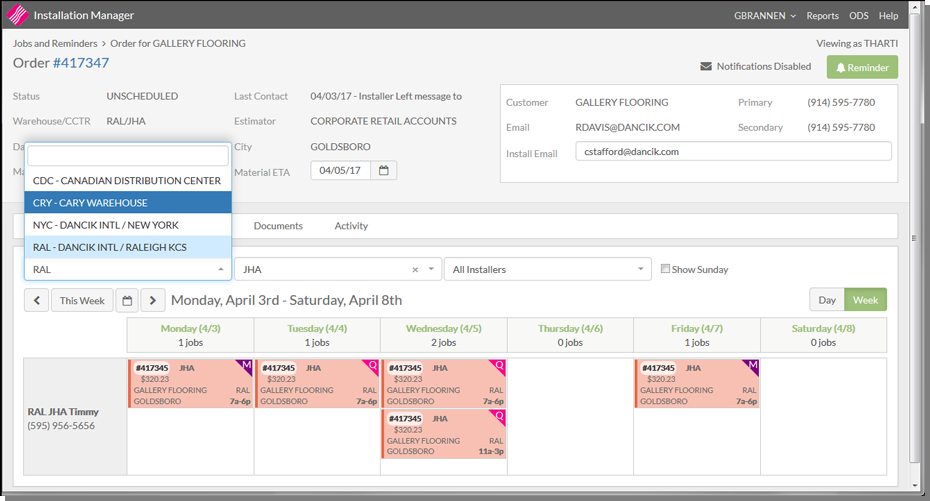
The Cost Center has to remain the same.
The Request Installation window pops up.
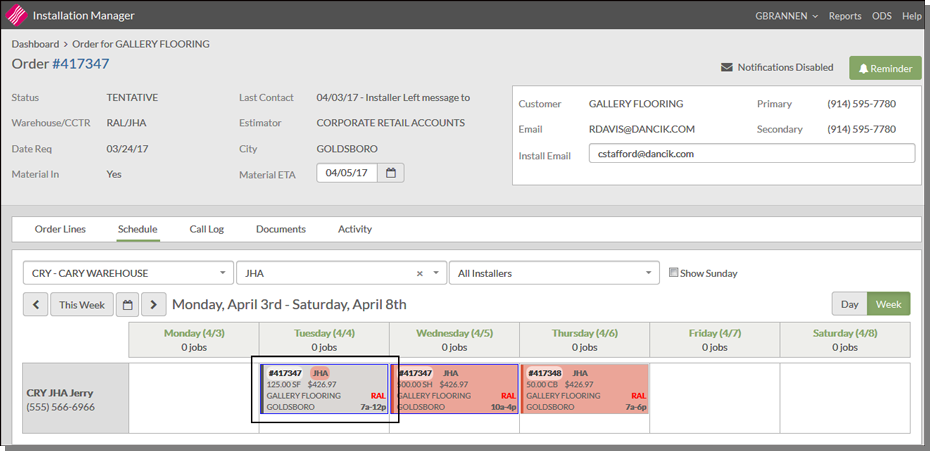
Colors are assigned by Cost Centers. When the order gets scheduled it changes to the color assigned to the cost center in the General section of the Admin Panel.
The Add to Schedule pop-up can also be used to:
- Add times when an installer is unavailable
- Schedule a quality revisit
On the calendar, scroll to the day you need to work with and click the "+" sign to access the Add to Schedule pop-up box. The QAT/MISC and Block Time options are at the top of the window.
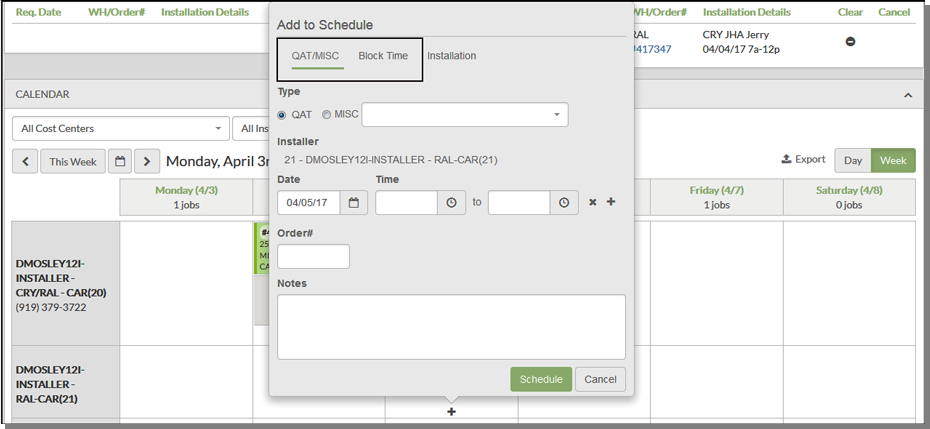
QAT/MISC
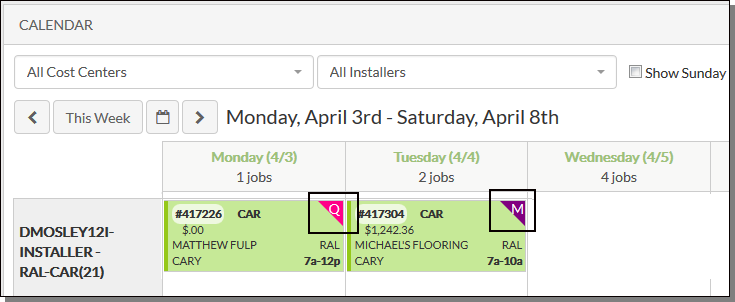
When a QAT installation gets added to the calendar, a "Q" is added to the order.
When a Misc installation gets added to the calendar, a "M" is added to the order. Use the dropdown menu to select a type. The options in the drop down menu are added via this path Admin Panel>General>Add to Schedule - Miscellaneous.
Block Time
Use this option to block a period of time that the installer is not available such as vacations, holidays or training.
Updating an Existing Schedule Entry
A user can only update the type of event that was initially created, for example if the entry was for blocking block time they can only update the block time or cancel it.
Also, the user can change the Installer during the update process.
Printing/Distributing Documents at the Order Level
Printing Documents By Date Range
Printing/Distributing Documents at the Order Level
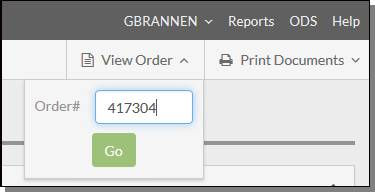
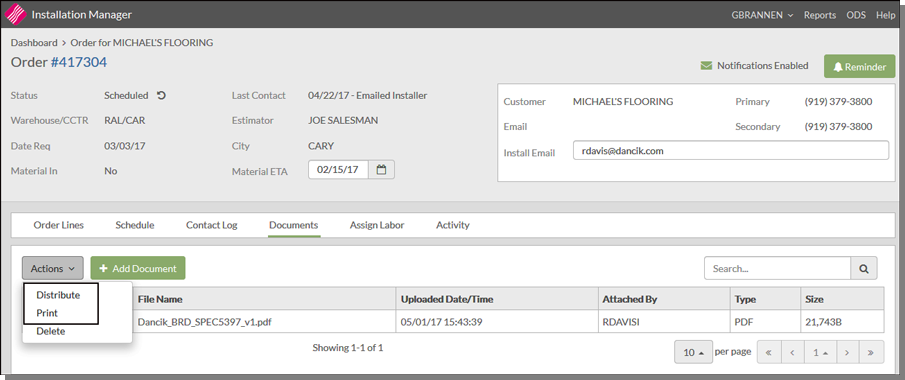
- Access an order by entering the number in the View Order box in the upper right hand corner.
- Click Go to access the order details.
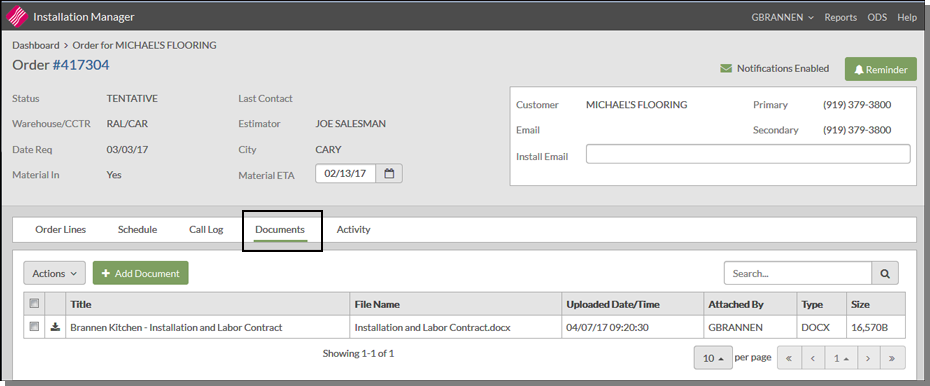
- Click on the Documents heading.
- Select the documents that you want to print or distribute.
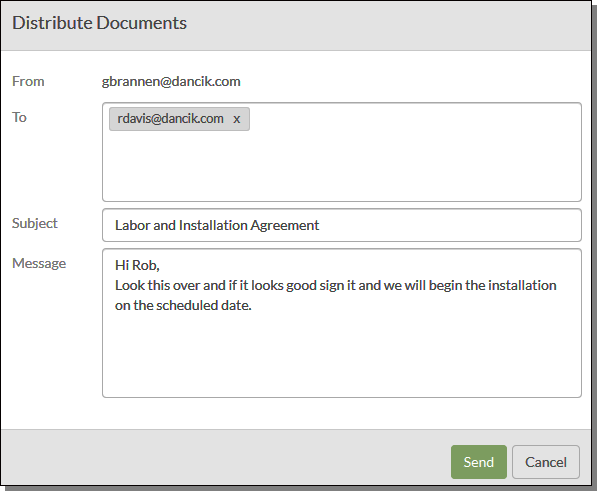
- Click the Actions drop down menu and select Print or Distribute.
- For printing, select a printer and click Print.
- Distributing Documents allows a user to email selected documents to a set of email address.
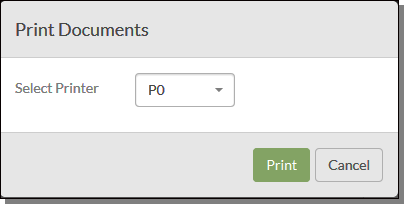
Printers are added to the drop down menu via this path: Admin Panel>General>PDF Accessible Printers.
Add Document
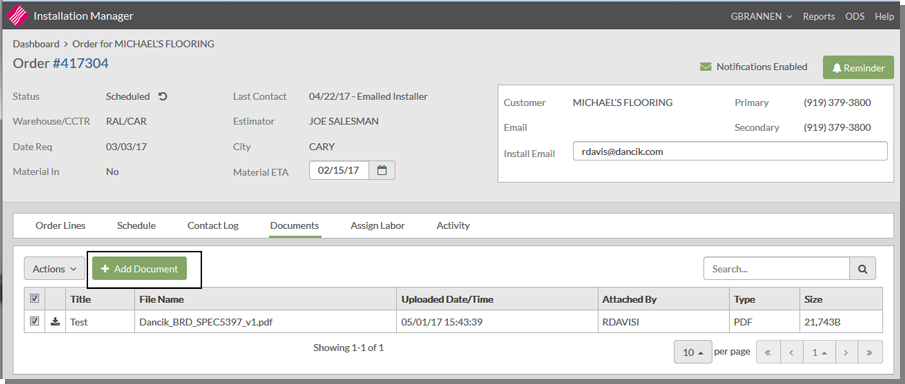
The Add Documents button opens a pop-up that allows users to locate and name documents to attached to an order.
Printing Documents By Date Range
- Click the Print Documents in the upper right hand corner of the Dashboard.
- Enter a Date Range, Printer and select the File Types to print. Documents are printed for all orders that have an instillation job scheduled within the entered date range.
- Click Print to send the selected documents created in the date range to the printer.
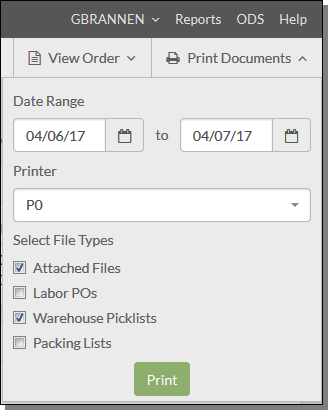
Printers are added to the drop down menu via this path: Admin Panel>General>PDF Accessible Printers.
Assigning Labor
This tab displays the labor lines on the an order (labor lines are those lines where the item component code = L). You can assign one installer to all the labor lines or select installers for each labor line. Once this is complete the labor line is then attached to the installer and can be used in the AP Labor Reconciliation process.
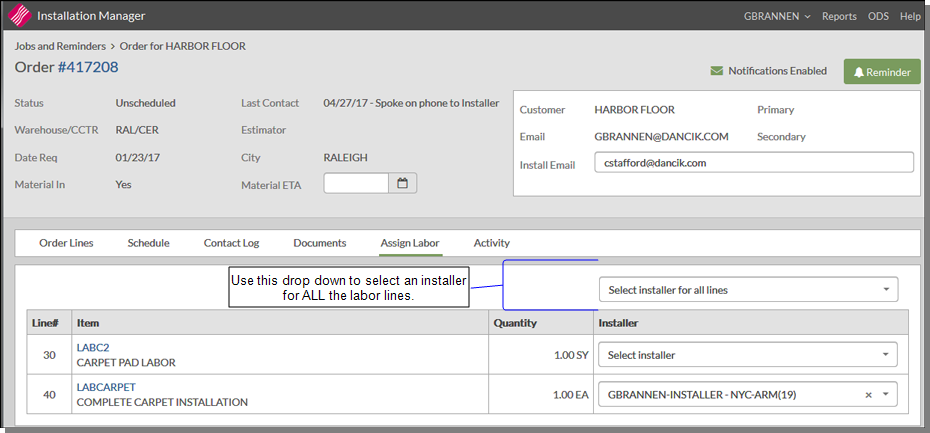
Accounting for Labor
Access Navigator AP and Enter an Installer's invoice or search for one: as shown below.
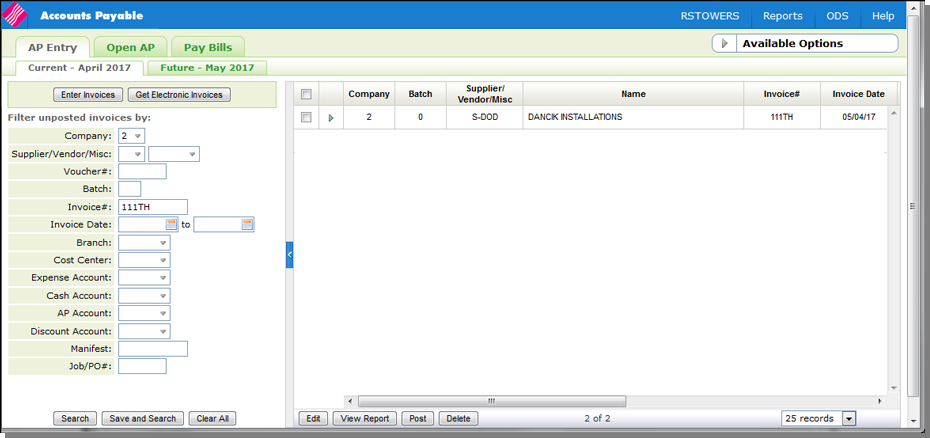
Click the option arrow to the left of the Invoice.
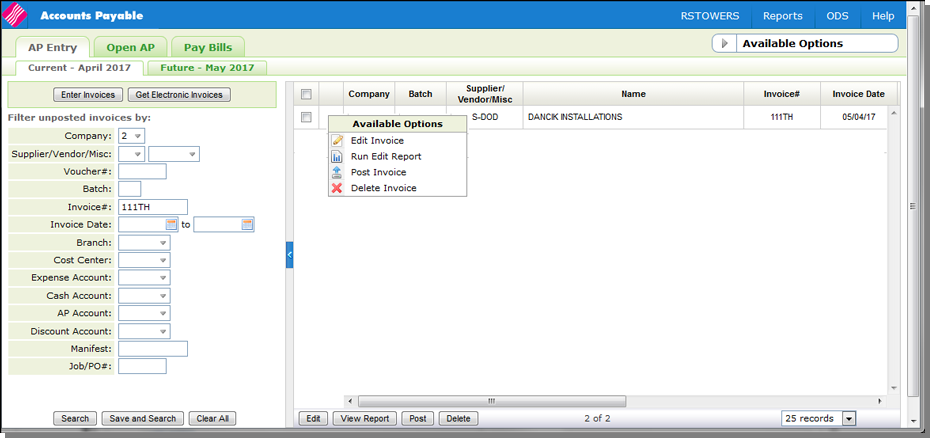
Select Edit Invoice to access the AP Entry window.
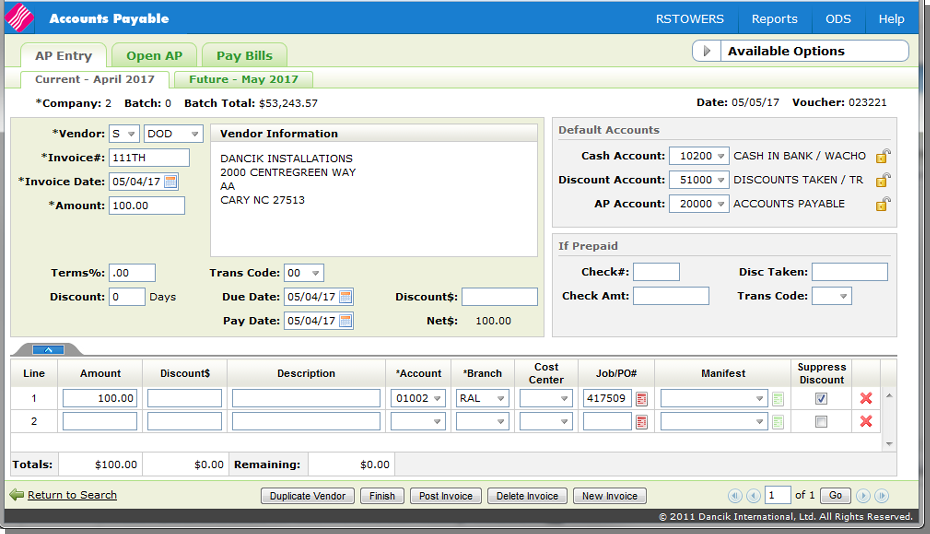
The red icon to the right of the Job/PO# setting lets you open the Labor Reconciliation and Order Inquiry window. This functionality lets you compare the cost of labor entered on a purchase order against what is actually being billed. If there is a variance, you can either accept the variance as an AP adjustment, or adjust the costs on the order.
Click an order line to display its details.
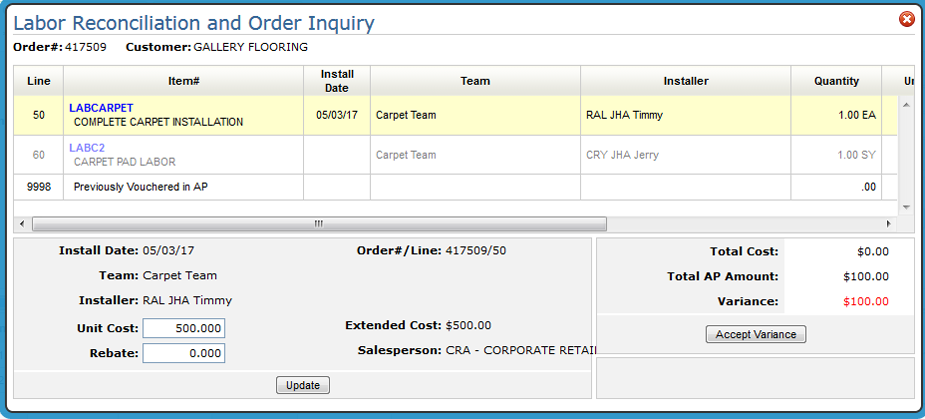
Only lines that have an installer assigned in the Assign Installer tab in Installation Manager order view will be able to be selected. An Installer that was not scheduled to work on the install, but was assigned in the Assign Labor tab will appear here, but the Install Date will be blank.
The Install Date, Team, and Installer values are pulled in from the Assign Labor Tab and the Vendor or Supplier Code that was assigned to the Installer in the Admin Panel Installer Configuration.
At this point you can:
- Accept the variance which will add another line to the invoice.
- Change the labor costs to remove the variance
- Click the labor item to display detail information.
- Change the labor cost or rebate as needed to eliminate or reduce the variance.
The dashboard displays the jobs that are awaiting approval, job requests and the installation calendar.
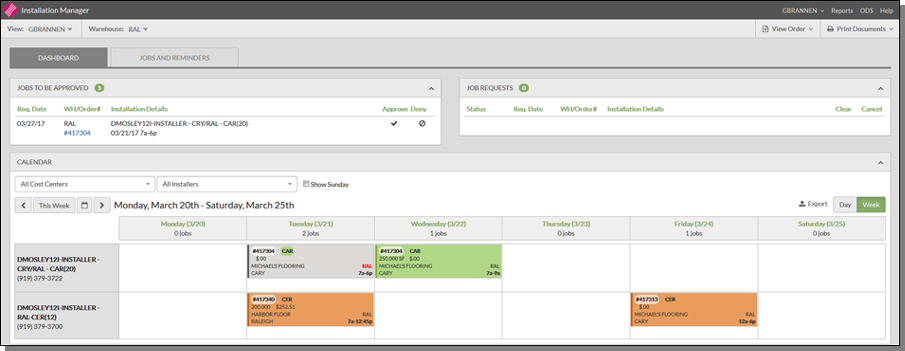
| Dashboard Section | Description |
|
View Alternate User
|
This drop down menu in the upper left hand corner allows you to view the alternate manager's warehouse / cost center calendar and data. Alternate managers are assigned via this path: Admin Panel>Installation>Managers. Default is set to show the manager that is currently logged in. |
|
Warehouse
|
This dropdown contains the list of warehouses assigned to the manager via the Admin Panel. The initial warehouse shown is the active Installation Manager's default warehouse. The warehouse controls the Installers shown in the calendar view. |
| Jobs to be Approved |

This box contains a list of Installers that are assigned to the active Install Manager's warehouse, but have been requested for use at a different warehouse. During the scheduling process an Install Manager can request an Installer from another warehouse. When that happens, the requests appear here. The installation job can be approved or denied by clicking Approve or Deny. If Approved, the job gets added to the requesting manager's calendar. Clicking on an order allows you to view it's associated scheduling information in the Order - Schedule screen. |
| Job Requests |

This section contains your requests to other installation managers to use one of the installation teams out of their warehouse(s). If the installation job gets approved, it is added to your installation calendar. A request can also be canceled prior to it being approved. Canceling the request adds the order back to the Unscheduled Jobs list. |
| Jobs and Reminders | |
| Unscheduled Jobs |
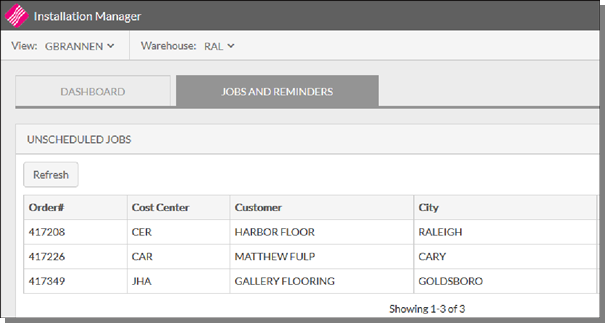
These are orders that are flagged for installation in Navigator Order Management or Selection Sheet Manager but haven't been scheduled for Installation.
Click an order to:
|
| Reminders |
Reminders are created by clicking the Reminder button while scheduling an order for installation. When Reminder is clicked the Set Reminder pop-up window appears.
Enter the Date and any applicable notes. When Save is clicked, the reminder is added to the Installation Manager's Reminder window and an entry is added to the Activity Log. |
| Calendar | |
|
Cost Center Installation Teams |
Changing these required fields changes the installers displayed. The entries contained in the drop downs are assigned to the active warehouse in the Admin panel.
For more information refer to Administration Panel. |
| Jobs Assigned per Day of the Week |
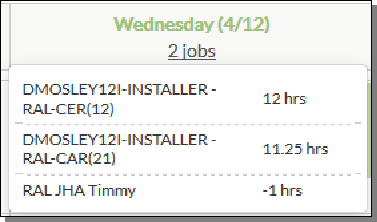
The total number of jobs assigned per day is displayed directly below the day. Click the number of jobs, in the example shown below it is 2 jobs, to view the job details.
The top entry is the total number of hours that the installer can work that day; as assigned in the Admin Panel. The 2 jobs and the required are shown next. If an entry is negative, the installer has been scheduled for more hours than they are assigned to in the Admin Panel. |
| Export |
The Export function, on the right hand side of the window, allows you to create a CSV file of the active warehouse, cost center and installer.
The following information is included in the CSV file:
|

